Top Liked Posts
-
There are no posts matching your filters.
-
158- Scope of this thread
The scope of this thread is ONLY to discuss about SP Flashtool program
- How to use Flashtool
- Report Flashtool errors and how to fix it.
Any other issues not related about Flashtool and its use should be posted in other specific thread.
Please DON'T discuss here about specific device issues like
- Where find ROM for a device
- How to fix problem on device
- etc
- Flash Tool hardware compatibily
SP Flash Tool are for Smartphone products
Mediatek MT62xx Familiy chips
Mediatek MT65xx Familiy chips
Mediatek MT67xx Familiy chips
- Support resources
Flashtool - 4PDA russian forum
SP FlashTool ||MTK Android FLASHER (xda)
Mediatek - Flash Tool - Info (mtk2000.ucoz.ru)
- Mediatek USB/ADB driver
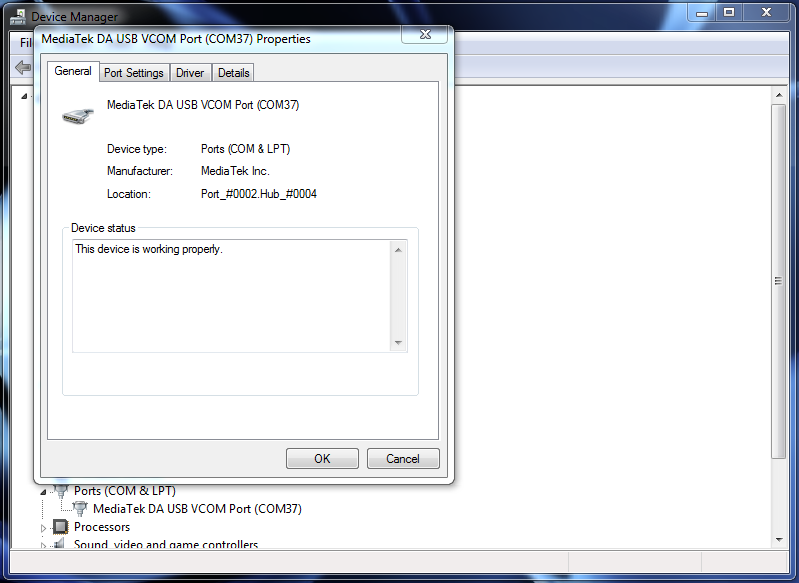
To use Flashtool you should have installer Mediatek USB preloader driver.
There are two types of USB driver for Mediatek devices.
- ADB USB driver for device working and switched on.
- Preloader USB driver to flash the device that is switched off.
To use Flashtool, in the PC should be already installed the USB Mediatek Preloader driver.
This the latest version of Mediatek driver.
This is the all-in.one driver (include both USB ADB & preloader driver).
Is not required to disable driver sign in Windows.
The driver is compatible with all 32/64bit Windows OS's (from Windows XP to Windows 10).
USB driver Mediatek (ADB/preloader) v. 5.1632 - Auto installer
How to install the USB ADB/Preloader driver
- Disconnect the device from the PC.
- Download and decompress the archive.
- Run the exe installer file (decompressed from archive) as administrator (right click -> Run as administrator).
- Follow the instruction on video and wait the end of installation
- At the end of installation close the installer and reboot the PC.
- Now the drivers are available for flash.
- Flashtool version
The new version 5.xx include the support of new 64bit Mediatek CPU (MT67xx - ex. MT6732/MT6752/etc)
The new version 5.xx are also compatible with 32bit Mediatek CPU (MT65xx - ex. MT6582/6589/6592) and new 64bit Mediatek CPU (MT67xx - es. MT6732/MT67527etc).
Flashtool v. 5.x fixed a critical bug about SP Flash Tool 3.x where the SP Flashtool reads incorrectly the scatter file of some new mobile based on MTK6582 (error: recovery partition is not flashable).
- Windows version
Latest version - 5.1916
SP Flash Tool v. 5.1916 for Windows
- Linux 64bit
Latest version: 5.1916
SP Flash Tool v. 5.1916 for Linux (64bit)
Flashtool for Linux - How to install
- SP Flash Tool archive mirror sites
SP Flashtool for Windows and Linux (spflashtools.com)
- "PMT Changed" error
If you get an error like "PMT Changed" (it means that partition scheme of current ROM and new ROM are different) and are you sure that the ROM is specific for your device you can use a special version of Flashtool 3.xx that bypass this error.
SP Flash Toolv. 3.1313 mod
- Direct Memory Write
To bypass a "PMT changed" error (it means that the partition scheme described in the scatter of the new ROM is different than the ROM installed) there are two ways
- If you have to flash the whole flash you can select in Flashtool the FIRWARE UPGRADE mode.
- If you have to flash single module/partition you can use Direct Memory Write
Direct Memory Write Info - post 713
Direct Memory Write Info - post 922
Direct Memory Write Info - Other thread
..9Read carefully before to continue!!!
- Please follow the instructions carefully
- The author of thread and xda forum will not take any responsibility on whatever may happen with your device.
- Always make sure that you trust the sources of the ROM you download and know that it is meant for your phone.
- After flashing a wrong preloader, your phone will be completely dead (can't be powered on, it will not charge and won't be detected anymore by the computer) and there is no way to recover it.
Instruction how to use Flashtool
..5
There are two ways to get around the PMT error. First way is to use an earlier version of the SP Flash Tool. Like version 3. But this does not always solve the problem.@bovirus
OKay, I can understand better, thanks.
Seems that my phone is dead, I try to get into Factory Test, but it only turns ON in a blank white screen blnking, so it maight be is the Main board that its damaged.
Thanks However")
The second way is to use the hidden Write Memory tab (hit the Ctrl-Alt-V combination on the keyboard to enter Advanced Mode, then select the Window > Write Memory option from the drop down menu. The Write Memory tab will then appear). Use the Write Memory tab to flash the images directly to the partition you wish starting from the memory address you specify. So if you had made a full ROM backup before you bricked your device (most people unfortunately fail to take this simple precaution), you would simply flash that ROM file starting at address 0x0.
You can find the correct starting addresses for each partition either on the download tab or by looking at the starting linear address in the scatter.txt file. For a softbrick, you might simply want to successively flash the boot.img, the recovery.img and the system.img to their appropriate partitions using the Write Memory tab.
When you use the Write Memory tab to flash, you must turn the phone off BUT leave the battery INSIDE the phone then connect the USB cable.
The Write Memory feature will only work if you identify the Preloader.bin file on the Download tab (so you must check the Preloader box on the Download tab). BUT DO NOT CHECK THE PRELOADER BOX IF YOU ARE GOING TO USE THE DOWNLOAD TAB TO FLASH THE DEVICE. ONLY CHECK THAT BOX IF YOU ARE GOING TO USE THE WRITE MEMORY TAB TO FLASH.
If you don't have the preloader.bin file, simply use the Read Back tab to dump it from the phone.
Finally, be absolutely sure you have the correct ROM for your phone. If the ROM is not the correct one for your device and you flash the wrong boot, recovery or system images to the phone, it will not boot. It will remain or become bricked. The fact that a ROM is for the same MTK chipset as your phone does NOT mean it's the correct ROM for your phone!
Sent from my Nexus 7 using XDA Free mobile app33What's needed:
- USB data cable
- MediaTek USB VCOM drivers
- SP Flash Tool ( Latest version SP_Flash_Tool_v3.1224.01)
- First of all, make sure that you have MediaTek DA USB VCOM drivers installed.

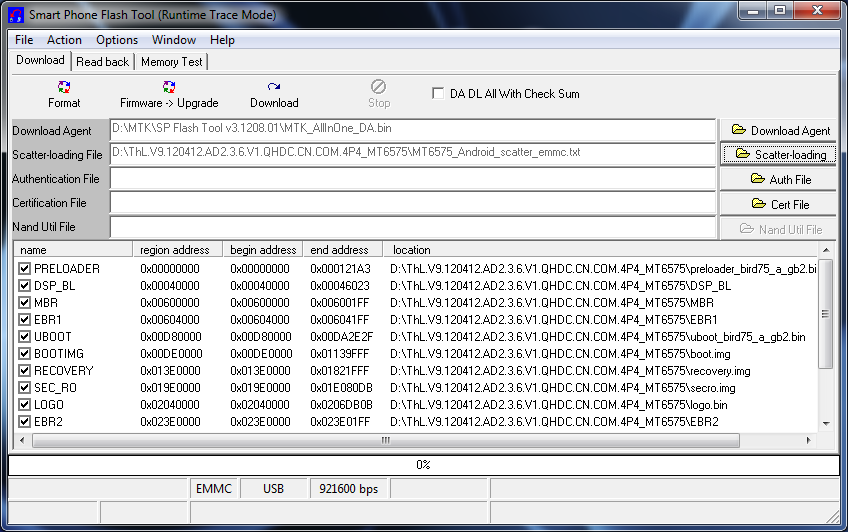
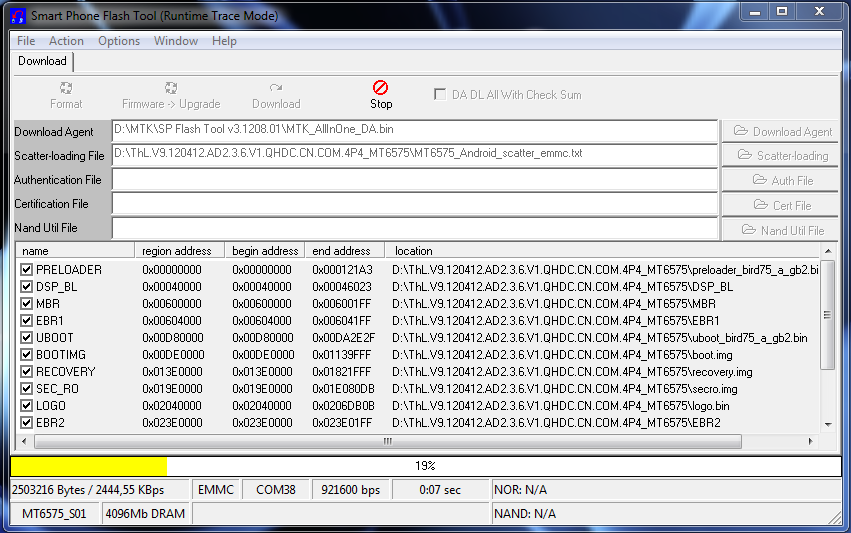
Flashing the whole ROM- First of all open SP Flash Tool, then click Scatter-loading button to load the correct scatter file
(MT6575_Android_scatter_emmc.txt or MT6577_Android_scatter_emmc.txt, depending on which phone you have) for your device and ignore any message that may appear.

- Turn off your phone, remove the battery and replace it after some seconds (and don't turn on the phone).
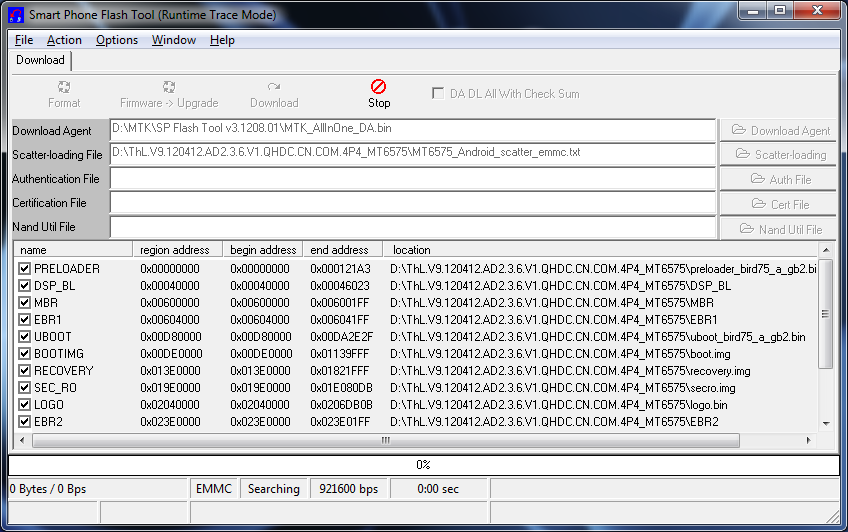
- Press F9 (or hit Download button) and connect your phone into the computer via USB data cable.
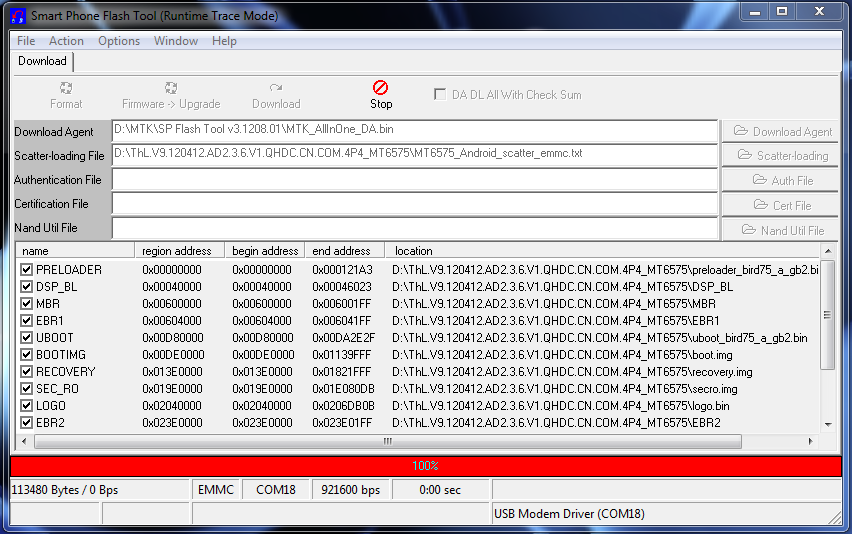
The process will start and a red progress bar will appear.


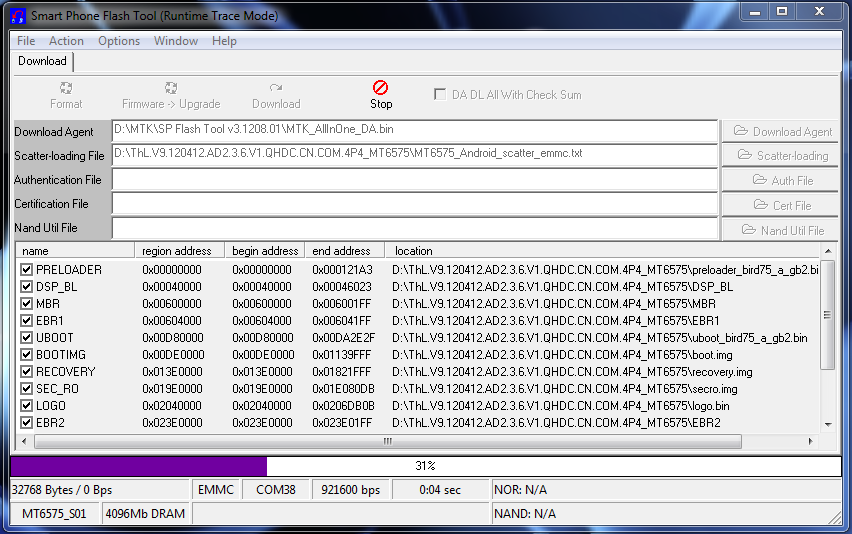
- After the red progress bar is complete, there will appear a purple progress bar.

- Right after the purple progress bar is complete, a message will appear underneath it:
“Please insert USB cable in x seconds” and then the download will start right away (you will see the yellow progress bar filling up).

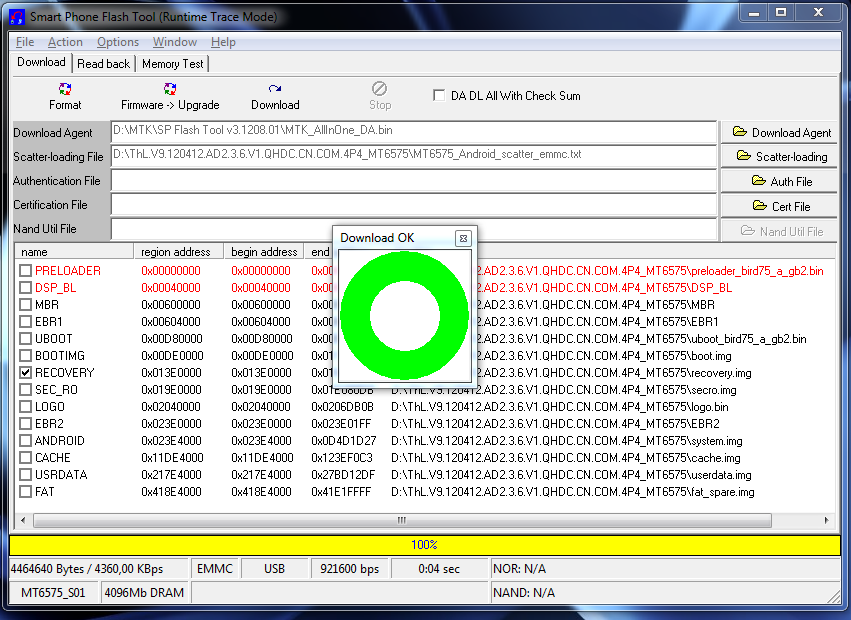
- When the yellow bar is complete, you'll get a popup with a green circle and Download OK message,
which means that the process has been successfully terminated.

- You can now safely disconnect your phone and turn it on. The process ends here.
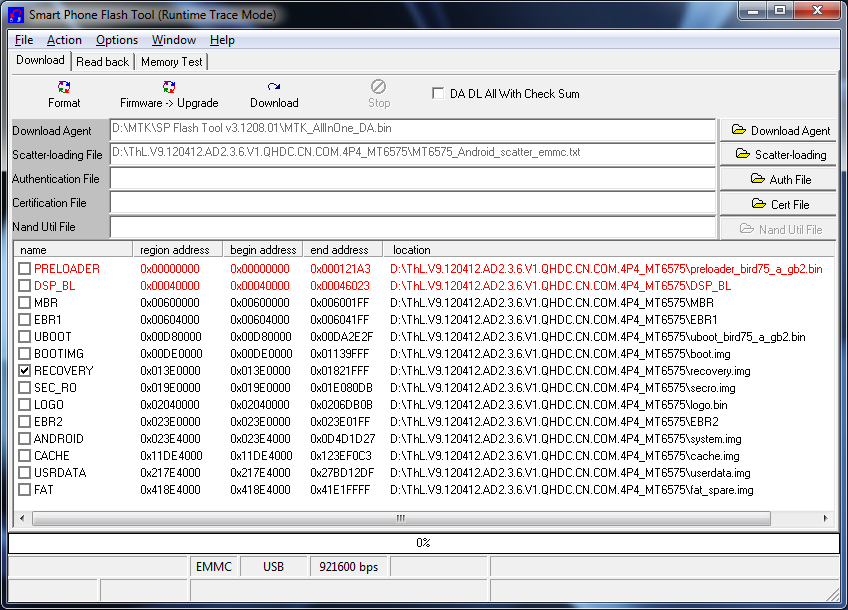
Flashing only part of the ROM- In case you want to flash just one part of the ROM, that is also possible. In the shown example, only recovery image will be flashed.
Deselect all parts except the one(s) you want to flash and then press F9 (or hit Download button).

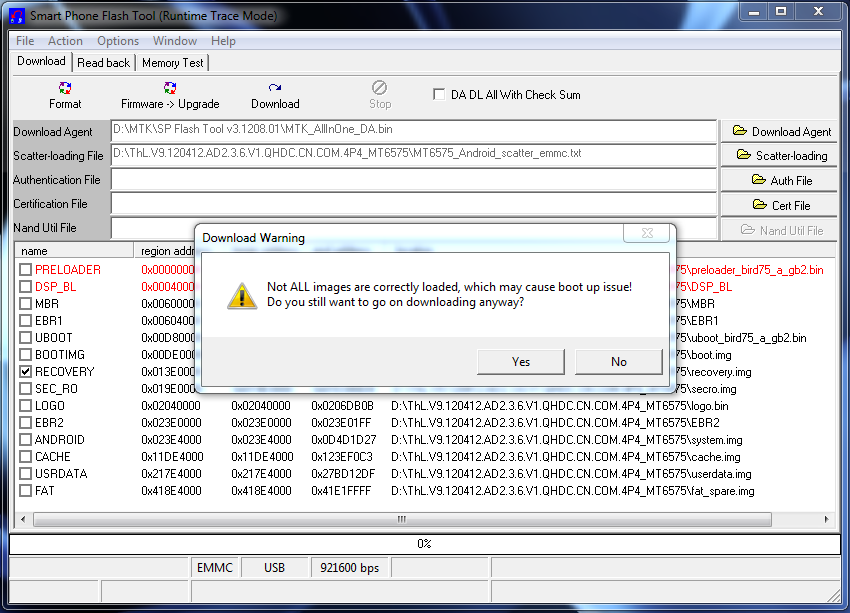
- The tool will immediately show a warning because not all parts are selected, but you should continue anyway. Safely press Yes to continue.

- The download of the chosen partition image will start and after the yellow bar is complete, the popup with the green circle should appear.


- Please note that, even though it isn't mandatory to select it on the list of images to flash,
preloader file must be present in the same folder as the other partition(s) that you want to flash, or else phone will not be able to enter into download mode.
Attention: Please follow the instructions carefully. I will not take any responsibility on whatever may happen with your phone.
Very important warning: Always make sure that you trust the sources of the ROM you download and know that it is meant for your phone.
After flashing a wrong preloader, your phone will be completely dead (can't be powered on, it will not charge and won't be detected anymore by the computer) and there is no way to recover it.
================
[Tool]SP FlashTool ||MTK Android FLASHER
http://xdaforums.com/showthread.php?t=1982576
======================
nice tuto thanks:good: